How to Create a Table in PostgreSQL Using pgAdmin and Terminal
Introduction
PostgreSQL is an open-source relational database management system (RDBMS) that is powerful, reliable, and versatile. It is widely used for a variety of applications, including data warehousing, online transaction processing, and web development. In this post, we will show you how to create a table in PostgreSQL using both the pgAdmin graphical user interface (GUI) and the terminal.
Creating a Table Using pgAdmin
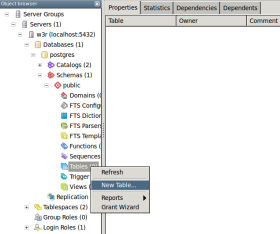
pgAdmin is a graphical user interface that makes it easy to manage PostgreSQL databases. To create a table using pgAdmin, follow these steps:
- Open pgAdmin and connect to your PostgreSQL database.
- Right-click on the database in which you want to create the table and select "Create" > "Table".
- In the "Table" dialog box, enter a name for the table and select the columns that you want to include in the table.
- Click on the "OK" button to create the table.
Creating a Table Using the Terminal
You can also create a table in PostgreSQL using the terminal. To do this, follow these steps:
- Open a terminal window and connect to your PostgreSQL database.
- Type the following command to create the table:
CREATE TABLE table_name ( column_name data_type, column_name data_type, ... );
- For example, to create a table called "accounts" with columns for "id", "name", and "balance", you would type the following command:
CREATE TABLE accounts ( id SERIAL PRIMARY KEY, name VARCHAR(255) NOT NULL, balance NUMERIC(10,2) NOT NULL DEFAULT 0.00 );
- Press Enter to execute the command and create the table.
Conclusion
Creating a table in PostgreSQL is a simple and straightforward process. You can use either the pgAdmin GUI or the terminal to create tables. Once you have created a table, you can begin adding data to it.


Comments